Route handles for wooden boxes
Description
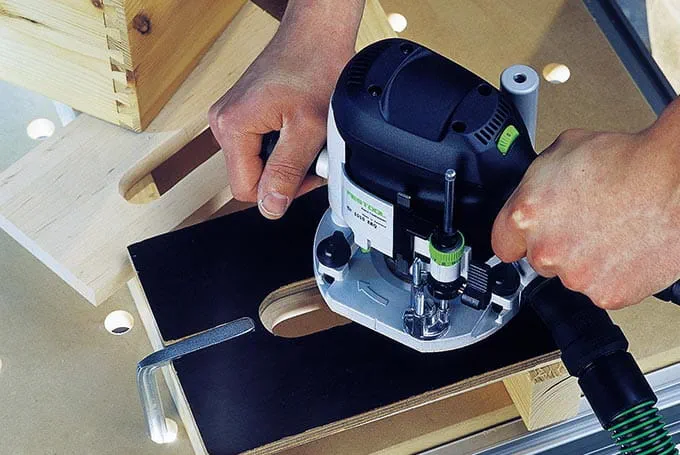
Box or furniture handles are required for transporting wooden boxes or opening furniture drawers. For boxes, these handles are either routed into the front and rear walls or in both side walls. For furniture drawers, a handle is usually only routed into the front panel, unless the drawer is meant to be opened from multiple sides. The routing work step is demonstrated in this application example of stackable carrier boxes.
Whenever possible, the handle should be routed before the drawer or box is glued. It is significantly more difficult to rout the handle after the workpiece has been glued. The potential methods of clamping a box that has been glued are far more limited than for the component alone.
The following material is required:
Phenolic plywood for the template
Tools/accessories
Alternative tools/accessories
Preparation/set-up
-
The special hand hole cutter is designed so that it can be lowered directly into the workpiece to be routed – there is no need for preliminary work using a groove cutter, as is required for working with other handle cutters.
However, work using the cutter requires a template, which can be produced as follows:- Take care when creating the template, as any inaccuracies will be visible on the finished workpieces and are very difficult to correct later. A template produced with precision can also be used later for other workpieces.
- The material thickness for the template should be at least 10 mm for drawer fronts with a thickness of between 15 and 19 mm. Phenolic plywood panels are particularly suitable for producing templates as they are very hard and robust. Additionally, they have an especially smooth surface, which allows the router table surface to slide particularly well.
- To guarantee that the template can be subsequently clamped, its dimensions should be at least 20 cm x 30 cm.

- Take care when creating the template, as any inaccuracies will be visible on the finished workpieces and are very difficult to correct later. A template produced with precision can also be used later for other workpieces.
-
The recessed handle should be at least 35 mm high and at least 90 mm wide. This allows a hand to grip it comfortably. Furthermore, it should be fitted 40 mm away from the upper edge of the box. To ensure that the template will fit perfectly in line with the edge of the workpiece, screw a rail onto the upper edge and use it as a stop.
The recess handle on the template can be drilled very easily using a Forstner drill bit. The corners that were not drilled can be machined using a jigsaw and then smoothed using a rasp or file.

-
Set up the router and multifunction table for routing as follows:
- Place the template on the workpiece and align it. The template and workpiece are placed on rails; these rails should not be positioned in the area where the handle is to be routed. The clamp clips should be fastened as close to the edge of the template as possible to ensure that they do not obstruct the routing procedure.
- Insert the hand hole cutter into the router. When doing so, ensure that the cutter shaft is fastened in the clamping chuck at least up to the minimum clamping depth. Set the speed according to the type of wood and the cutter diameter.

- Place the template on the workpiece and align it. The template and workpiece are placed on rails; these rails should not be positioned in the area where the handle is to be routed. The clamp clips should be fastened as close to the edge of the template as possible to ensure that they do not obstruct the routing procedure.
-
Set the routing depth. When doing this, ensure that the distance from the cutter tip to the middle of the radius is 19 mm. This dimension is important because the routing depth is calculated as follows: Routing depth = 0.5 x material thickness in mm + 19 mm
Connect an extractor to the cutter to keep dust exposure to a minimum while routing the handle.

Procedure
-
Then, proceed as follows to rout the handle:
- Position the router on the clamped workpiece and move the cutter to the middle of the handle.
- Switch the cutter on and lower it into the workpiece to the set depth. Lock the router's locking button.
- Ensure that you rout in a reverse direction and move the cutter and its bearing guide in this direction towards the template. Follow the shape of the template, thereby routing the handle into the workpiece.

- Position the router on the clamped workpiece and move the cutter to the middle of the handle.
-
After routing the handle, immediately switch off the router. Once the cutter has come to a complete stop, unlock the locking button, remove the cutter from the workpiece and take the router out of the workpiece.

-
Our illustrated guides and work results are documented working steps that we have performed in practice. They are individual examples and do not guarantee or promise that users will obtain the same results. The results will depend on the user's experience and skill, as well as the material being used. Illustrated guides do not replace any Festool operating manuals and/or safety instructions. Liability for ensuring that the information, instructions and applications are free from content defects and defects of title, in particular with regard to the absence of defects, correctness, freedom from third party intellectual property rights and copyrights, completeness and fitness for purpose, is excluded. Claims for damages made by the user, regardless of their legal basis, are excluded. These liability exclusions are not applicable if the damage was intentional or caused by gross negligence, or in cases of statutory liability.
We cannot accept liability for damage resulting from defects.↑


